Table of Contents
The total amount of light that falls on the photodiode is what sets the timing of this accumulative light circuit.
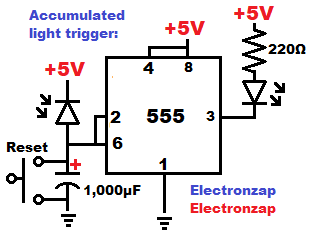
Parts of the circuit.
- 555 timer integrated circuit: Wired as a (digital) inverter Schmitt trigger. Low input (below 1/3 supply voltage) to pin 2 sets the output High. High input (above 2/3 supply voltage) to pin 5 sets the output low. Between 1/3 and 2/3 supply voltage is the hysteresis range. That is where the output stays in whatever state it was last put into.
- Normally open (NO) Pushbutton switch (reset): Instantly discharges the timing capacitor to 0V while being pressed (closed). Does nothing while not being pressed (open).
- Photodiode: While reverse biased the photodiode passes a certain amount of current through it based on how much light is falling on it, but only for as long as there is a voltage different across it. In this circuit, there is a voltage difference across the photodiode for as long as the capacitor is not fully charged.
- Capacitor: Takes time to charge based on how much current is flowing into it. A 1,000µF capacitor (the same as a 1mF), will take 5 seconds to charge to 5V if charged with 1mA of current. Whereas it will take 10 seconds for it to charge to 5V with 0.5mA of current. Another example is that it will take 2 1/2 seconds to charge to 5V with 2mA of current charging it.
- LED: Anode is headed to the positive supply. That means that it will not pass current and light up until the Cathode is more negative by about 2V for a red LED, which is usually their forward voltage. The LED will be off while the 555 output is high, due to the pushbutton switch having been pressed in this case, but after the photodiode gets enough light to charge the capacitor to 2/3 supply voltage, then the output goes low (0v), and the LED turns on due to it now having 5V across it and it’s protective resistor.
Video:
To support this site, check out the following links:
- Become a Patron!
- Check out my YouTube videos! https://www.youtube.com/c/Electronzap/videos
- Products I used in my videos or otherwise think look like a good buy. As an Amazon associate, I earn from qualifying purchases. https://www.amazon.com/shop/electronzapdotcom
This is a new page that will be updated soon!
- Information on this site is not guaranteed to be accurate. Always consult the manufacturer info/datasheet of parts you use. Research the proper safety precautions for everything you do.
- Electronzap is a participant in the Amazon Services LLC Associates Program, an affiliate advertising program designed to provide a means for sites to earn advertising fees by advertising and linking to amazon.com.