Table of Contents
I needed help adding JavaScript to this post that I made with WordPress. Apparently you can’t just type JavaScript directly to a WordPress page or post. This page will explain what I ended up doing.
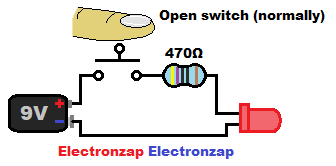
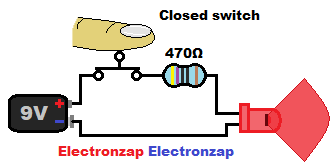
My goal was to figure out how to get the buttons above to alternate a single image between the 2 images below.
Note: I am using a plugin so that I can edit my pages and posts in the classic format. I don’t know how the following list will differ if using the block editor that WordPress has switched to using.
I am also just a beginner coder that followed advice from different websites in order to get this done. I’m mostly making this post to remind myself of how I was able to get this code to show up on WordPress. If it help others, then all the better 🙂 . I’m sure there’s better ways to do this though.
- I added and activated the plugin called “Code Embed” to my WordPress.
- I went to edit my post (the one you are viewing now), and clicked “Screen Options” tab that is located at the top of the post editor. I then made sure that “Custom Fields” option was selected, which it already was.
- I scrolled down towards the bottom of the post editor screen (I kept scrolling below the content of the post that I was writing) until I got to where it says “Custom Fields”.
- I clicked the down arrow to expand the “Custom Fields” options.
- I clicked the “Enter new” link, which is located under where it says “Add New Custom Field:”.
- I added the name CODEledOnOff , (Note: the first word in the name has to be CODE in all caps). I don’t know what the naming rules are after that, so I made it one long name with no spaces or hyphens between words.
- Then in the value box I added the following code down below. Beware!: An ad may be inserted between parts of the written out code text below. Unfortunately that is out of my control as they are automatically inserted to the page. …
<button onclick=”document.getElementById(‘ledOnOff’).src=’https://electronzap.com/wp-content/uploads/2021/07/LED-on-while-in-pushbutton-switch-controlled-circuit-schematic-diagram-by-electronzap.png'”>Turn on the LED</button>
<img id=”ledOnOff” src=”https://electronzap.com/wp-content/uploads/2021/07/LED-off-while-in-pusbutton-switch-controlled-circuit-schematic-diagram-by-electronzap.png” style=”width:336px”>
<button onclick=”document.getElementById(‘ledOnOff’).src=’https://electronzap.com/wp-content/uploads/2021/07/LED-off-while-in-pusbutton-switch-controlled-circuit-schematic-diagram-by-electronzap.png'”>Turn off the LED</button>
- And then I clicked the “Add custom field” button.
- Now, wherever I want those buttons that alternate the pushbutton images to show up on the post, I simply type {{ followed by CODEledOnOff and then }} . The CODEledOnOff text is inserted directly between the doubled opening curly brackets and the double closing curly brackets. There are no spaces between the brackets or text.
To support my work, check out the following!
- Become a Patron!
- Check out my YouTube videos! https://www.youtube.com/c/Electronzap/videos
- Products I used in my videos or otherwise think look like a good buy. As an Amazon associate, I earn from qualifying purchases. https://www.amazon.com/shop/electronzapdotcom
- Information on this site is not guaranteed to be accurate. Always consult the manufacturer info/datasheet of parts you use. Research the proper safety precautions for everything you do.
- Electronzap is a participant in the Amazon Services LLC Associates Program, an affiliate advertising program designed to provide a means for sites to earn advertising fees by advertising and linking to amazon.com.