(Left click) Click on/select an item – Tap (touch and then release) mouse pad with one finger.
(Right click) Show more commands – Tap (touch and then untouch) mouse pad with 2 fingers.
Scroll – Place 2 fingers on the mouse pad, then slide them up, down, left, or right. The items on the page that your cursor is on will slide in the directions that your fingers move, as long as the page can scroll in that direction.
Zoom in (enlarge the page that the cursor is on) – Touch the mouse pad with 2 fingers close together, and then slide them away from each other. Release the pad when you are done, or need to repeat the process to zoom in even more.
Zoom out (shrink the page that the cursor is on) – Touch the mouse pad with 2 fingers with a bit of space between them, and then slide them towards each other. Release the mouse pad when you are done, or if you need to repeat the process to zoom out even farther
There’s more that can be done with touch pad, but these are the ones I need to use most often. Therefore I assume they will be the most helpful for others to know. Do a Google search for more info. Also I added an affiliate link below for books on related topics.
Electronzap is a participant in the Amazon Services LLC Associates Program, an affiliate advertising program designed to provide a means for sites to earn advertising fees by advertising and linking to amazon.com.
I needed help adding JavaScript to this post that I made with WordPress. Apparently you can’t just type JavaScript directly to a WordPress page or post. This page will explain what I ended up doing.
My goal was to figure out how to get the buttons above to alternate a single image between the 2 images below.
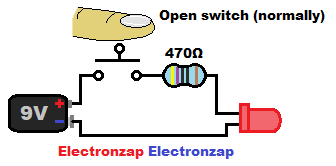
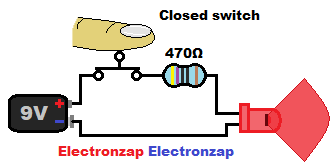
LED off while in pushbutton switch controlled circuit schematic diagram by electronzapLED on while in pushbutton switch controlled circuit schematic diagram by electronzap
Note: I am using a plugin so that I can edit my pages and posts in the classic format. I don’t know how the following list will differ if using the block editor that WordPress has switched to using.
I am also just a beginner coder that followed advice from different websites in order to get this done. I’m mostly making this post to remind myself of how I was able to get this code to show up on WordPress. If it help others, then all the better 🙂 . I’m sure there’s better ways to do this though.
I added and activated the plugin called “Code Embed” to my WordPress.
I went to edit my post (the one you are viewing now), and clicked “Screen Options” tab that is located at the top of the post editor. I then made sure that “Custom Fields” option was selected, which it already was.
I scrolled down towards the bottom of the post editor screen (I kept scrolling below the content of the post that I was writing) until I got to where it says “Custom Fields”.
I clicked the down arrow to expand the “Custom Fields” options.
I clicked the “Enter new” link, which is located under where it says “Add New Custom Field:”.
I added the name CODEledOnOff , (Note: the first word in the name has to be CODE in all caps). I don’t know what the naming rules are after that, so I made it one long name with no spaces or hyphens between words.
Then in the value box I added the following code down below. Beware!: An ad may be inserted between parts of the written out code text below. Unfortunately that is out of my control as they are automatically inserted to the page. …
<button onclick=”document.getElementById(‘ledOnOff’).src=’https://electronzap.com/wp-content/uploads/2021/07/LED-on-while-in-pushbutton-switch-controlled-circuit-schematic-diagram-by-electronzap.png'”>Turn on the LED</button>
<button onclick=”document.getElementById(‘ledOnOff’).src=’https://electronzap.com/wp-content/uploads/2021/07/LED-off-while-in-pusbutton-switch-controlled-circuit-schematic-diagram-by-electronzap.png'”>Turn off the LED</button>
And then I clicked the “Add custom field” button.
Image of Code led On Off text since I can’t write it directly to the post
Now, wherever I want those buttons that alternate the pushbutton images to show up on the post, I simply type {{ followed by CODEledOnOff and then }} . The CODEledOnOff text is inserted directly between the doubled opening curly brackets and the double closing curly brackets. There are no spaces between the brackets or text.
Information on this site is not guaranteed to be accurate. Always consult the manufacturer info/datasheet of parts you use. Research the proper safety precautions for everything you do.
Electronzap is a participant in the Amazon Services LLC Associates Program, an affiliate advertising program designed to provide a means for sites to earn advertising fees by advertising and linking to amazon.com.
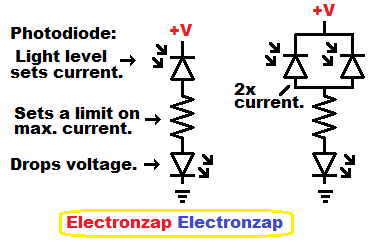
Photodiodes allow current to pass through them based on how much light is falling on them. While reversed biased, the more light that falls on a photodiode, the more current that it allows to pass through it.
A series resistor will limit how much current can flow, but the photodiode will be what sets the current up to that limit. It must be kept in mind that the current limit set by a resistor alone will depend on the supply voltage minus any voltage drops of other series components. and the resistance of the resistor (Ohms law).
Having 2 photodiodes in parallel, both reversed biased of course, will allow twice as much current to flow for a given amount of light. That is of course if the same amount of light happens to fall on both of them. They can easily point away from light sources, and end up not receiving much of the light.
The photodiodes in the affiliate link ad above have mostly good reviews and probably act like the ones used in my video but are a bit larger. Some reviewers mentioned that they are actually phototransistors, which I suspect is true based on what they said, and my earlier testing of the photodiodes that I bought elsewhere, and have gotten the same results that they did. Regardless, I will still call them photodiodes for now since that is what they are being sold as and I can’t prove that they aren’t at this time.
Information on this site is not guaranteed to be accurate. Always consult the manufacturer info/datasheet of parts you use. Research the proper safety precautions for everything you do.
Electronzap is a participant in the Amazon Services LLC Associates Program, an affiliate advertising program designed to provide a means for sites to earn advertising fees by advertising and linking to amazon.com.
We use cookies on our website to give you the most relevant experience by remembering your preferences and repeat visits. By clicking “Accept All”, you consent to the use of ALL the cookies. However, you may visit "Cookie Settings" to provide a controlled consent.
This website uses cookies to improve your experience while you navigate through the website. Out of these, the cookies that are categorized as necessary are stored on your browser as they are essential for the working of basic functionalities of the website. We also use third-party cookies that help us analyze and understand how you use this website. These cookies will be stored in your browser only with your consent. You also have the option to opt-out of these cookies. But opting out of some of these cookies may affect your browsing experience.
Necessary cookies are absolutely essential for the website to function properly. These cookies ensure basic functionalities and security features of the website, anonymously.
Cookie
Duration
Description
cookielawinfo-checkbox-analytics
11 months
This cookie is set by GDPR Cookie Consent plugin. The cookie is used to store the user consent for the cookies in the category "Analytics".
cookielawinfo-checkbox-functional
11 months
The cookie is set by GDPR cookie consent to record the user consent for the cookies in the category "Functional".
cookielawinfo-checkbox-necessary
11 months
This cookie is set by GDPR Cookie Consent plugin. The cookies is used to store the user consent for the cookies in the category "Necessary".
cookielawinfo-checkbox-others
11 months
This cookie is set by GDPR Cookie Consent plugin. The cookie is used to store the user consent for the cookies in the category "Other.
cookielawinfo-checkbox-performance
11 months
This cookie is set by GDPR Cookie Consent plugin. The cookie is used to store the user consent for the cookies in the category "Performance".
viewed_cookie_policy
11 months
The cookie is set by the GDPR Cookie Consent plugin and is used to store whether or not user has consented to the use of cookies. It does not store any personal data.
Functional cookies help to perform certain functionalities like sharing the content of the website on social media platforms, collect feedbacks, and other third-party features.
Performance cookies are used to understand and analyze the key performance indexes of the website which helps in delivering a better user experience for the visitors.
Analytical cookies are used to understand how visitors interact with the website. These cookies help provide information on metrics the number of visitors, bounce rate, traffic source, etc.
Advertisement cookies are used to provide visitors with relevant ads and marketing campaigns. These cookies track visitors across websites and collect information to provide customized ads.